Showing posts with label scrapbooking. Show all posts
Showing posts with label scrapbooking. Show all posts
Friday, January 09, 2015
My CHA predictions
Based on the sneaks I see at The Scrap Review and Scrapbook Update, I predict seafoam and peachy pink to be dominant colors, along with lots of metallic gold highlights. Everyone will be releasing stamps and dies under their own name (let's hope they are all good quality). And pocket scrapbooking will bring some strong competition to traditional scrapbooking. Let's see how correct am I when I walk the floor tomorrow.

Monday, January 13, 2014
Happy Monday!
When I walked into the office this morning, I found these at my desk. I missed out on the We R Memory Keepers washi/washi tape holder last year, but that's okay because this year's tape has even better designs! A coworker kindly picked this up from the local Costco for me since I'm not a member. My goal is to limit the open rolls to what's in the holder. Let's see how long that lasts.
 If I expand my collection, I'll probably go with this idea.
The peanut M&Ms were the last from a giant warehouse store bag that a coworker saved for me. I better donate to the candy fund to keep the goodies coming.

The peanut M&Ms were the last from a giant warehouse store bag that a coworker saved for me. I better donate to the candy fund to keep the goodies coming.
Saturday, January 11, 2014
CHA Winter 2014
I had the opportunity to attend CHA this year, thanks to my LSS friend. I hadn't been to CHA for four or five years so a lot has changed. There are fewer exhibitors and companies are going for smaller booths. There are fewer make-and-takes. There are more places to sit and rest (maybe that's because they needed to fill space). That said, there is still lots to see and oohh and ahh over. My forever favorites Jillibean Soup and Bella Blvd., and new favorites like Lawn Fawn are showing, but I didn't take any pics of their booths. You can see all their new collections at their websites.
What's hot? Pages, journaling cards, and embellishments for Project Life/Life Documented are hot. There are smaller pockets for Instagram photos and DIY to customize your pocket page cards (I thought the divided pages were supposed to make scrapbooking quick and easy). A surprise to me was how many companies are showing dies. I've never seen so many companies show dies and I know of several others who aren't showing). I remember when Sizzix was the first company to make a home die cutter and when Quickutz was $149 an alphabet, just upper or lower case, not both. Mixed media and art journaling are still popular. This means stencils are hot. Washi is still hot...everyone has added washi or paper tape to their product line. Lots of enamel dots. Not as many wood veneers (but still quite a bit) or chipboard. Nor cabachon flowers or shabby chic (thank goodness for me!). Cameras and stars are still popular themes. DIY is big, whether you're a scrapbooker or other crafter.
What did I see that excited me? First up, a small company from the UK, Photomate. (I always like highlighting new companies.) This is foldable display photobooth, perfect for photographing your creations. You use the stand as is or you can add a drape. It includes a storage case, about 15x15:
 Here it is in action:
 Estimated price is $30. I think this would be so much easier (and save space) compared to the posterboards I've been using. They're looking for a US distributor if you're interested. I'd rather buy one here than pay for shipping from the UK.
We R Memory Keepers is offering albums for your Instagram photos. Such a cute idea!
 Here's a close-up of the album:
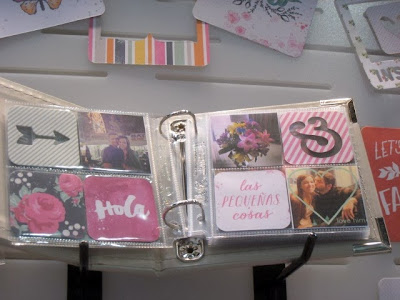
Simple Stories has added some must-haves. Photo overlays:

Photo flips (haven't I seen these from someone else before?), great for adding another photo or more journaling.

More pocket pages, includes lots of 2x2 slots.

And DIY pieces to make your own goodies to fill those pockets.

I enjoyed testing out the Cutter Pillar Pro trimmer and saw the Fiskars 12' x12'' Rotary Ruler Combo. They didn't have it there to try, but I was able to test the 6''x24'' version. Fiskars mean this for cutting fabric, but of course, we scrapbookers are all over it. Note that this requires a cutting pad to protect your table. I need a new trimmer and am still undecided.

My favorite new-to-me company is Little B. Their website does not do their products justice. They have great paper tape and washi tape and dies.

They also have nesting circles, scallops, squares, labels, hearts, stars (~$24); birthday, travel, party, baby themes (~$15), and these phrase collections ($25), and much more.

Look at these!!!! There's the nesting scallops on the right. But what I'm most excited about are the first two. The first is a magnetic storage folder (~$6). All their dies come in same folder, but I'd like to get a few for my other dies. That thing in the middle? That's their "Perfect Positioner" ~$4. It is a slightly sticky clear mat that you stick to your cutting pad. It holds your die(s) in place and has measurements/guidelines to help you align everything. This is high on my wishlist!

Little B had an adorable make-and-take, but I didn't take a picture of mine since I didn't finish it. I didn't sit down until almost 5:00 and it was lights out before I finished.
For more CHA photos, check out the Perfect Day Scrapbooking Facebook page. She can order (almost) anything you want and ships throughout the US.
What's hot? Pages, journaling cards, and embellishments for Project Life/Life Documented are hot. There are smaller pockets for Instagram photos and DIY to customize your pocket page cards (I thought the divided pages were supposed to make scrapbooking quick and easy). A surprise to me was how many companies are showing dies. I've never seen so many companies show dies and I know of several others who aren't showing). I remember when Sizzix was the first company to make a home die cutter and when Quickutz was $149 an alphabet, just upper or lower case, not both. Mixed media and art journaling are still popular. This means stencils are hot. Washi is still hot...everyone has added washi or paper tape to their product line. Lots of enamel dots. Not as many wood veneers (but still quite a bit) or chipboard. Nor cabachon flowers or shabby chic (thank goodness for me!). Cameras and stars are still popular themes. DIY is big, whether you're a scrapbooker or other crafter.
What did I see that excited me? First up, a small company from the UK, Photomate. (I always like highlighting new companies.) This is foldable display photobooth, perfect for photographing your creations. You use the stand as is or you can add a drape. It includes a storage case, about 15x15:


We R Memory Keepers is offering albums for your Instagram photos. Such a cute idea!


Simple Stories has added some must-haves. Photo overlays:
Photo flips (haven't I seen these from someone else before?), great for adding another photo or more journaling.
More pocket pages, includes lots of 2x2 slots.

And DIY pieces to make your own goodies to fill those pockets.

I enjoyed testing out the Cutter Pillar Pro trimmer and saw the Fiskars 12' x12'' Rotary Ruler Combo. They didn't have it there to try, but I was able to test the 6''x24'' version. Fiskars mean this for cutting fabric, but of course, we scrapbookers are all over it. Note that this requires a cutting pad to protect your table. I need a new trimmer and am still undecided.
My favorite new-to-me company is Little B. Their website does not do their products justice. They have great paper tape and washi tape and dies.

They also have nesting circles, scallops, squares, labels, hearts, stars (~$24); birthday, travel, party, baby themes (~$15), and these phrase collections ($25), and much more.

Look at these!!!! There's the nesting scallops on the right. But what I'm most excited about are the first two. The first is a magnetic storage folder (~$6). All their dies come in same folder, but I'd like to get a few for my other dies. That thing in the middle? That's their "Perfect Positioner" ~$4. It is a slightly sticky clear mat that you stick to your cutting pad. It holds your die(s) in place and has measurements/guidelines to help you align everything. This is high on my wishlist!

Little B had an adorable make-and-take, but I didn't take a picture of mine since I didn't finish it. I didn't sit down until almost 5:00 and it was lights out before I finished.
For more CHA photos, check out the Perfect Day Scrapbooking Facebook page. She can order (almost) anything you want and ships throughout the US.
Monday, June 03, 2013
Take a guess

.
.
.
.
.
.
.
.
.
.
.
.
.
Hint: it isn't animal or vegetable.
.
.
.
.
.
.
.
.
.
.
.
.
Hint: it was to do with scrapbooking.
.
.
.
.
.
.
.
.
.
.
.
.
I didn't realize the cap on my adhesive wasn't secure and almost half the bottle leaked out. Good thing I kept it in a plastic bag. Bummed that a couple dollars got wasted, but thankful for plastic bags. Otherwise, a whole lotta supplies would have been ruined.

Saturday, June 01, 2013
Congratulations!
We took a few days off to travel to Texas for our nephew's wedding. Mr. Fix-it asked if I was going to make their wedding card (of course dear!), but he was getting a bit anxious since I didn't finish it until two days before we left.
I envisioned something slightly different, but when I got my dies out, I saw that a redesign was in order because of the size of the die. Guess that's part of the creative process, right? It was a country wedding so I didn't want to go glittery or too bright. I'm really happy with how it turned out and hope the bride and groom like the card.

I envisioned something slightly different, but when I got my dies out, I saw that a redesign was in order because of the size of the die. Guess that's part of the creative process, right? It was a country wedding so I didn't want to go glittery or too bright. I'm really happy with how it turned out and hope the bride and groom like the card.

supplies: Quickutz die, Club Scrap textured paper, Coordinations pearl paper, vellum, Papertrey Ink stamp, Martha Stewart pearls.
Sunday, March 31, 2013
Card Swap, month 2
This month's hostess was Susan and she put together an awesome kit. Now, if I were smart, I would have put together my cards when we got together for a scrapping weekend, but nooooo, I had to wait, as usual.
This kit was full of beautiful Basic Grey. I can't believe it was a collection I didn't buy. I probably have a couple hundred sheets still. I used to love Basic Grey until I figured out I didn't know how to use the paper. But maybe I just need to use the paper for cards? The kit was also full of yummy embellishments like Lasting Impressions buttons (which I now covet), all kinds of die cuts and chipboard, an assortment of American crafts goodies, card bases, and much more. Although we're not supposed to buy anything for the kits (the supplies are supposed to come from our stash), Susan was a rebel and bought the lovely MFT stamps from an Operation Write Home fundraiser. Here's a photo of the kit after I made my cards. You can see that I could make half a dozen more cards with what's left.

My first card is a variation of my standard design of a rectangle with border. This time, I added some flowers from the kit. I got the "love" ribbon from an LSS giveaway and I love how it matches the papers. I used some Making Memories paint on the chipboard and some LI brads from my stash.

Of course, I had to use the bunny. I couldn't think of how to use the sentiments from the stamp set, so I decided to break out a Quickutz die. The journaling circle is Jillibean Soup, the stamp is Papertrey Ink, the ribbon is a scrap I had sitting around, and the brads are from Joanns. I hope a service person will enjoy sending this to a loved one.

For my last card, I broke out a Paper Shapers punch. I bought it last year at an LSS sale and am so happy I have it in my tool bin. I curled the petals around a pen and also used foam adhesive to help keep the petals poofed up. The stamp is from 3bugsinarug.
 .
.
Thanks for an awesome kit! And thanks for the card bases. I need to get some of that good cardstock.
Here are the rest of the cardmakers. Visit them and leave them some comment love.
Susan's cards:
http://simplysusansscrap.blogspot.com
Katie:
http://www.2craftykaties.blogspot.com/
Peggy:
http://myviewfromthebleachers.blogspot.com/
Wendy:
http://shesgonecrafty.blogspot.com/
Laurie:
http://www.scrapsfromthebeach.com/
This kit was full of beautiful Basic Grey. I can't believe it was a collection I didn't buy. I probably have a couple hundred sheets still. I used to love Basic Grey until I figured out I didn't know how to use the paper. But maybe I just need to use the paper for cards? The kit was also full of yummy embellishments like Lasting Impressions buttons (which I now covet), all kinds of die cuts and chipboard, an assortment of American crafts goodies, card bases, and much more. Although we're not supposed to buy anything for the kits (the supplies are supposed to come from our stash), Susan was a rebel and bought the lovely MFT stamps from an Operation Write Home fundraiser. Here's a photo of the kit after I made my cards. You can see that I could make half a dozen more cards with what's left.

My first card is a variation of my standard design of a rectangle with border. This time, I added some flowers from the kit. I got the "love" ribbon from an LSS giveaway and I love how it matches the papers. I used some Making Memories paint on the chipboard and some LI brads from my stash.

Of course, I had to use the bunny. I couldn't think of how to use the sentiments from the stamp set, so I decided to break out a Quickutz die. The journaling circle is Jillibean Soup, the stamp is Papertrey Ink, the ribbon is a scrap I had sitting around, and the brads are from Joanns. I hope a service person will enjoy sending this to a loved one.

For my last card, I broke out a Paper Shapers punch. I bought it last year at an LSS sale and am so happy I have it in my tool bin. I curled the petals around a pen and also used foam adhesive to help keep the petals poofed up. The stamp is from 3bugsinarug.
 .
. Thanks for an awesome kit! And thanks for the card bases. I need to get some of that good cardstock.
Here are the rest of the cardmakers. Visit them and leave them some comment love.
Susan's cards:
http://simplysusansscrap.blogspot.com
Katie:
http://www.2craftykaties.blogspot.com/
Peggy:
http://myviewfromthebleachers.blogspot.com/
Wendy:
http://shesgonecrafty.blogspot.com/
Laurie:
http://www.scrapsfromthebeach.com/
Tuesday, March 19, 2013
Can you say addicted?
Sigh, I just can't resist Quickutz dies and fonts. Even though I think the quality has gone down and there are dozens of competitors now, I keep going back to the familiar.
Whenever I cropped with friends, I found myself always borrowing the same fonts so I thought I better add them to my collection. I got a smokin' ebay deal on this baby, only $8.50 with free shipping. I felt bad for the seller, but happy for me.
Now, if only I could find the same deal for Moxie in the classic size. I really need to catalog all of my dies and fonts. I did have a list, but lost it when my computer sort of died last year. I better do it soon before I start buying duplicates.
Whenever I cropped with friends, I found myself always borrowing the same fonts so I thought I better add them to my collection. I got a smokin' ebay deal on this baby, only $8.50 with free shipping. I felt bad for the seller, but happy for me.

Now, if only I could find the same deal for Moxie in the classic size. I really need to catalog all of my dies and fonts. I did have a list, but lost it when my computer sort of died last year. I better do it soon before I start buying duplicates.
Thursday, January 31, 2013
Card swap round 1, month 4
Leslie was our hostess for the last month of this round of the card kit swap. She included a variety of papers and embellishments in various themes (look! I remembered to take a picture of the kit!)
This first card isn't quite done. Everything you see is from the kit. I can't find the embellishments I want to add, but I don't, I'm sure I'll find something else to use in the stash.
Everything but the ribbon is from the kit in this next card. I cut out the words from the patterned paper and used it like the old MM Wordfetti.
I used my own card base in the next card (not that you can tell the difference from the white cardstock in the previous photo, lol). Notice a theme in my design? I think I need to branch out. I added the dots using Ranger enamel accents. I wish Ranger sold this is other colors or sold just the black separately. I'm sure I'll go through the black much faster than the white.
This last card is also all from the kit, except for the "celebrate" rubon from American Crafts. I had a heck of a time getting the rubon to stick. I'm not sure if it was because my rubon is so old or the texture/finish of the cardstock repelled the rubon. I would have gone to punched letters, but I was too lazy to dig out my
I think I need to make one more card so I can make use of the pink buttons Leslie included.
Since Leslie doesn't have a blog, I've included them here.


Here are Susan's cards. And Katie's cards. Stop by their blogs and leave them a little comment love.
We'll have some new swappers joining us for the next round and I'm busy putting together the kits. I didn't make my goal of not being the last to post my cards, but at least I did it before the end of the month.

This first card isn't quite done. Everything you see is from the kit. I can't find the embellishments I want to add, but I don't, I'm sure I'll find something else to use in the stash.

Everything but the ribbon is from the kit in this next card. I cut out the words from the patterned paper and used it like the old MM Wordfetti.

I used my own card base in the next card (not that you can tell the difference from the white cardstock in the previous photo, lol). Notice a theme in my design? I think I need to branch out. I added the dots using Ranger enamel accents. I wish Ranger sold this is other colors or sold just the black separately. I'm sure I'll go through the black much faster than the white.

This last card is also all from the kit, except for the "celebrate" rubon from American Crafts. I had a heck of a time getting the rubon to stick. I'm not sure if it was because my rubon is so old or the texture/finish of the cardstock repelled the rubon. I would have gone to punched letters, but I was too lazy to dig out my

I think I need to make one more card so I can make use of the pink buttons Leslie included.
Since Leslie doesn't have a blog, I've included them here.


Here are Susan's cards. And Katie's cards. Stop by their blogs and leave them a little comment love.
We'll have some new swappers joining us for the next round and I'm busy putting together the kits. I didn't make my goal of not being the last to post my cards, but at least I did it before the end of the month.
Tuesday, January 01, 2013
Card swap month 3


My first card was 95% from the kit. That crushed velvet ribbon is so pretty! The only addition was the rhinestones in the upper corner. Katie did include some that were the perfect size, but I decided I wanted them in color and then when I found these square ones in my stash, I liked how they played off of the grid pattern on the paper.

For my second card, I added the Prima flowers(that red flower looks pink in person, really!). I was going for a pseudo fireworks effect. The embossing was from a Quickutz die.

My last card (and favorite) was all from the kit except for the stamp, which is from Papertry Ink. I had a little trouble with the vellum butterfly sticker and ended up placing it on some cardstock and then cutting it out.

Here are Susan's cards. You can see the beautiful blue paper there.
Here are Katie's cards. Check out all those Spanish sayings. ¡bellísimo
It was another great month! January is the last month for this group. We should be getting our supplies from Leslie soon. I will be opening up the swap again in February and will have multiple groups if there is enough interest. Let me know and you'll get first crack at a spot.
Sunday, December 02, 2012
Creative Palette giveaway
Here's your chance to win some goodies from one of my favorite designers, Nancy Thomas. I've been a fan of hers since the Lifetime Moments days. She started a blog after LM closed and I've been able to continue to enjoy her creations. Here's a link to the giveaway.
Saturday, December 01, 2012
Card swap, month 2
Susan was the hostess for November's card swap. She told us she stuffed the packages and she wasn't kidding! As usual, I forgot to take a photo of the goodies before I dug in, but Susan has a photo on her blog. Here's just a partial list of what she included:
 I love, love, love the red paper (Luxe?), both the A and B sides. It is rare that I like both sides of a double-sided paper. The pearls were a pain to glue on. Normally, I'd have used Stickles or a Viva pen, but since pearls were included in the kit, I decided to go for it. The only part of card that I added was the black satin ribbon.
Card 2 and Card 3 are similar designs. Try as I might, I am a simple cardmaker. Maybe I need Scrapfest (an online crop challenge that Lifetime Moments used to sponsor) to encourage me.

 The only parts not from the kit are one of the card bases and the black brads. When I looked for brads to use, I discovered that I have FOUR kinds of black mini brads: Lasting Impressions matte, Bazzil matte, JoAnn's, and one no-name brad. Yes, they are visibly different and I had to try them all (I ended up using the no-name brads). On the third card, I just trimmed the paper slightly to fit the card front and the design left a perfect space for the flowers (or I could have put a sentiment there). Those Chatterbox nails made nice flower centers.
This final card uses the KI Theory that I mentioned earlier. How much do I like this paper? As the last LSS trash to treasures sale, I bought a few sheets of this paper to add to my stash (I don't have much of the paper; I didn't buy any when it first came out). I added the card base and stamped sentiment to this card.

Check out what the other ladies made:
Leslie's cards
Katie's cards
Susan's cards
Susan gave us sooo many goodies, I'm sure I could make a dozen more cards. Thanks Susan! I heard that Katie's kit is on its way to us. I can't wait!
- All kinds of embellishments including pearl beads, ribbon, flowers, and brads
- Library pocket (I never know what to do with these)
- Chatterbox Scrapbook Nails (these are "vintage" scrapbook embellishments)
- Slide mounts (as are these)
- Flower lace (loved this, even though I ended up not using it)
- KI Softie (loved this too)
- Scenic Route alphabet stickers
- Card bases and envelopes
- And some of my favorite paper from KI (their Color Theory paper from 2006) and Luxe Designs

Card 2 and Card 3 are similar designs. Try as I might, I am a simple cardmaker. Maybe I need Scrapfest (an online crop challenge that Lifetime Moments used to sponsor) to encourage me.


This final card uses the KI Theory that I mentioned earlier. How much do I like this paper? As the last LSS trash to treasures sale, I bought a few sheets of this paper to add to my stash (I don't have much of the paper; I didn't buy any when it first came out). I added the card base and stamped sentiment to this card.

Check out what the other ladies made:
Leslie's cards
Katie's cards
Susan's cards
Susan gave us sooo many goodies, I'm sure I could make a dozen more cards. Thanks Susan! I heard that Katie's kit is on its way to us. I can't wait!
Card swap, month 2, Leslie's cards
Leslie is part of our card swap, but doesn't have a blog so I've volunteered to post her cards for her here.
All of her cards have extra touches like lots of inking (which doesn't show up very well in the photos, unfortunately) or stamping.


This card has a fun surprise inside:


Here's a cute little "Hello" card:


And a romantic wedding card:

Susan, November's swap hostess, challenged us to do a layout with the leftovers, and Leslie rose to the challenge:

And you get a bonus! Leslie's daughter, J, wanted to get in on the action so Leslie sent along her creations:


Thanks for playing along Leslie and J!
All of her cards have extra touches like lots of inking (which doesn't show up very well in the photos, unfortunately) or stamping.


This card has a fun surprise inside:


Here's a cute little "Hello" card:


And a romantic wedding card:

Susan, November's swap hostess, challenged us to do a layout with the leftovers, and Leslie rose to the challenge:
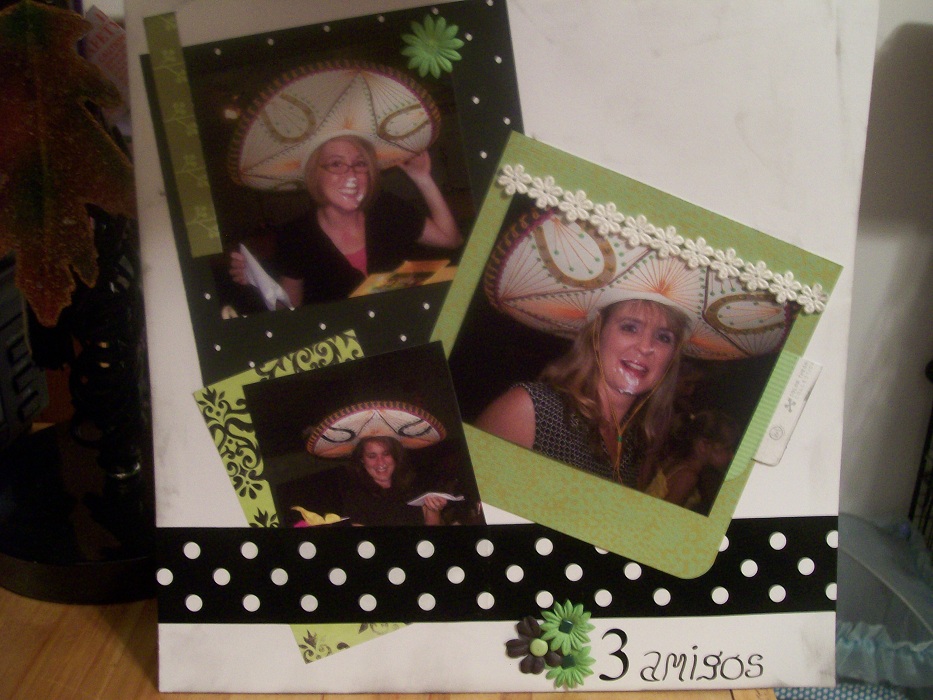
And you get a bonus! Leslie's daughter, J, wanted to get in on the action so Leslie sent along her creations:


Thanks for playing along Leslie and J!
Tuesday, October 30, 2012
Card swap, month 1
It is time for the big card reveal from the first month's card swap. As it turns out, putting together a kit is more work than I expected. I kept changing my mind about what card bases to use and which patterned papers to include. I should have included more (and meant to), but with my craft supplies spread out all over the house, I forgot to include a few things.
You can see some of the original kit here. I meant to take a photo of the full kit, but forgot. The kit included:
2 5.5x8.5 sheets of Bazzill cardstock
2 DCWV card bases
1/2 sheet of 12x12 patterned paper
6x6 sheet of patterned paper
ribbons, fiber, buttons, brads, flowers
Here's a link to Susan's cards. I like how she mixed the card bases and patterned paper in ways I hadn't thought of.
Leslie doesn't have a blog so she sent me a photo of her cards. She has waaaaay more patience than I do to fussy cut the tree and leaves. And the present pyramid is super cute!

Katie posted her cards on her blog. Check out the owls and leaves she made.
Here are my cards. I really like this first card. I used a border punch on the card base and then added a strip from another card base. I die cut "Celebrate" from the Bazzill and added the brads. I thought it was a little plain so I added some fiber from my stash. (I'm finally using the fibers from my stash. I don't really use fiber on my scrapbook pages, but I'm really liking them on my cards.)

Everything on this next card is from the kit. I again used my border punch and added a strip from the Bazzill to lengthen the card front. Just a few flowers with the brad centers and this could be a hello, celebrate, or any occasion card.

Finally, a fall card with one of the patterned papers, ribbons, and button from the kit. I used some cardstock from my stash for the card base and inked up the edges.
 Yep, I admit I didn't use the Christmas paper or red fiber. I've got two card ideas in my head, but they're not coming together. If they do, I'll update this post.
Thank you Susan, Katie, and Leslie for participating and I can't wait to see what's in Susan's kit!
You can see some of the original kit here. I meant to take a photo of the full kit, but forgot. The kit included:
2 5.5x8.5 sheets of Bazzill cardstock
2 DCWV card bases
1/2 sheet of 12x12 patterned paper
6x6 sheet of patterned paper
ribbons, fiber, buttons, brads, flowers
Here's a link to Susan's cards. I like how she mixed the card bases and patterned paper in ways I hadn't thought of.
Leslie doesn't have a blog so she sent me a photo of her cards. She has waaaaay more patience than I do to fussy cut the tree and leaves. And the present pyramid is super cute!

Katie posted her cards on her blog. Check out the owls and leaves she made.
Here are my cards. I really like this first card. I used a border punch on the card base and then added a strip from another card base. I die cut "Celebrate" from the Bazzill and added the brads. I thought it was a little plain so I added some fiber from my stash. (I'm finally using the fibers from my stash. I don't really use fiber on my scrapbook pages, but I'm really liking them on my cards.)

Everything on this next card is from the kit. I again used my border punch and added a strip from the Bazzill to lengthen the card front. Just a few flowers with the brad centers and this could be a hello, celebrate, or any occasion card.

Finally, a fall card with one of the patterned papers, ribbons, and button from the kit. I used some cardstock from my stash for the card base and inked up the edges.

Thank you Susan, Katie, and Leslie for participating and I can't wait to see what's in Susan's kit!
Subscribe to:
Posts (Atom)